Control who sees your content and when.

Every piece of content on the platform has a publishing state that determines its visibility. Understanding these states helps you manage drafts, collaborate with colleagues, and control when content goes live.

The Three States

Published 

Content is visible to everyone. If someone has the URL, they can see the page. Published content appears in navigation, search results, and any feeds or listings it belongs to. 

Note: You can further restrict access to Faculty, Staff, and/or Students using the Page Access settings. For more information, visit Access Controls.

Draft 

A published page has unpublished changes saved to a new revision. The live version remains visible to the public, but your edits are stored separately and only visible to editors in your site group. This allows you to work on updates without affecting what visitors see. You can share the draft URL with colleagues for review before pushing changes live.

Unpublished 

Content is hidden from the public entirely. Only users with editing access to your site can view unpublished pages. Use this state for content that isn't ready yet or needs to be taken down temporarily.

Changing a Page's State

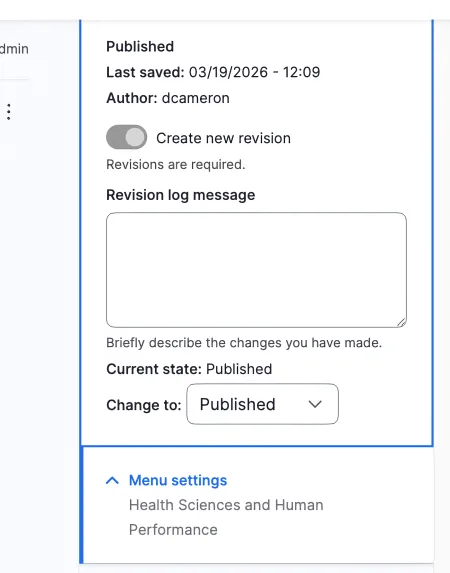
Screenshot of the Publishing Option associated with a page.

To change the publishing state of a piece of content:

  1. Open the content in edit mode.
  2. Look at the panel on the right side of the edit screen. Near the top it shows the Current state of the page.
  3. Locate the Change to dropdown directly below it.
  4. Select the state you want, then click Save.
A Note on Unpublishing Nested Content

If you unpublish a Topic or Category that contains child pages, those children will remain publicly visible. The parent may be hidden, but the nested pages are not automatically unpublished with it.

For this reason, when taking down a section of your site, start at the deepest level (the individual pages) and work your way up. This ensures nothing remains accessible unintentionally.

Understanding Revisions

Every time you save a piece of content, the platform creates a revision: a snapshot of the page at that moment. These revisions accumulate over time, forming a complete history of the content's evolution.

Revisions are created automatically. You do not need to turn anything on. Every save adds a new revision to the history.

Revisions capture everything: text changes, reordered paragraphs, updated images, and modified settings. Each revision records who made the change and when, so you always have a clear audit trail. The panel on the right side of the edit screen also shows the Last saved date and the initial Author of the page.

Revisions allow for safe experimentation. You can make significant changes knowing that the previous version is preserved, and if an edit doesn't work out, you can restore an earlier revision.

Adding a Revision Log Message

When you edit a page, you can add a Revision log message : a short note describing what you changed. The field sits in the panel on the right side of the edit screen, just above the state controls, with the prompt "Briefly describe the changes you have made."

The message is optional, but it is worth filling in. It appears next to the author and timestamp in the revision history, so a clear note like "Updated fall application deadline" makes it much easier for you or a colleague to find the right version later.

Viewing Revision History

To see the revision history for a piece of content:

  1. Navigate to the page.
  2. Select Revisions from the tabs near the top of the page.
  3. You'll see a list of all saved revisions, including the date, time, author, and log message of each.

The current live version is labeled Current revision in the list.

Comparing Revisions

The revisions list lets you compare any two versions to see exactly what changed between them.

  1. On the Revisions page, find the two revisions you want to compare.
  2. Use the radio buttons in the table to mark one revision as the Source revision and another as the Target revision .
  3. Click Compare selected revisions .

The comparison highlights the differences between the two versions. This is useful for confirming what an edit changed before you decide whether to keep it or revert.
Reverting to an Earlier Version

If you need to restore an earlier version:

  1. On the Revisions page, find the revision you want to restore.
  2. Click Revert in the Operations column for that revision.

Reverting does not delete the intermediate revisions. It simply creates a new revision that matches the content of the selected older version. Your full history remains intact.

Note: Revisions cannot be deleted. The history is permanent, which means you can always trace and recover any past version of a page.

Drafts and Revisions Together

Drafts and revisions work hand in hand. When you save a published page as a draft, you're creating a new revision that isn't yet live. The public continues to see the most recent published revision while you refine the draft.

Once you're satisfied, changing the state back to Published pushes your draft revision live. The previous published version remains in the revision history, so you can always reference or restore it.

This workflow allows you to stage changes, gather feedback, and publish updates with confidence.

Looking for Intercom publishing options?

Intercom has a more flexible system for scheduling content, repeating posts, and limiting access to a post until a specified time has passed. For more information, view the link below.