Images bring pages to life, but a few simple requirements apply to every image you upload to the site.

This guide covers how to prepare your images, upload them, and make sure they display the way you intend.

Before you upload: image size requirements

Every image on the site must be at least 320 pixels wide and 240 pixels tall. Images smaller than that cannot be uploaded.

Some components display images at a wider aspect ratio and require a minimum width of 640 pixels. If you try to use an undersized image in one of those components, you may see an error or the image may not appear as expected. When in doubt, aim for images that are at least 1200px wide — this gives the site enough to work with at any screen size and at any crop ratio.

Checking and resizing your image

If you are not sure how large your image is, you can check right from your computer:

  • On a Mac : Open the image in Preview, then go to Tools > Adjust Size. The width and height are shown in pixels.
  • On Windows : Right-click the image file, choose Properties, then open the Details tab. Width and height are listed under "Image."

If your image is too small, you have a few options:

  • Request a higher-resolution version from whoever provided the photo. This is the best option as scaling a small image up will make it look blurry.
  • Use a free online tool such as Adobe Express, Canva, or Squoosh to resize or export images at a larger size. Keep in mind that these tools cannot add detail that wasn't in the original and work best when you are cropping a larger image down to a specific size.

Accepted file types are: PNG, GIF, JPG, JPEG, and WEBP. The maximum file size is 10 MB.

Uploading an Image

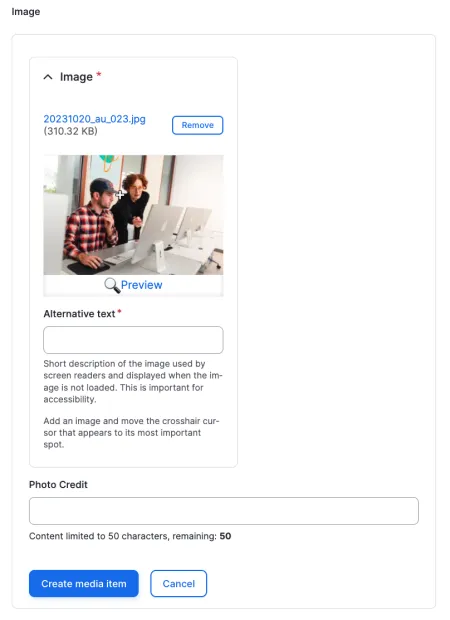
UI demo of uploading an image

When you add a component that includes an image field, you will see an Image upload area with a "Choose File" button. Click it to select a file from your computer.

Once the file is selected, it will upload automatically. You will see a status message confirming the upload and showing the file's renamed path. A thumbnail preview of your image will appear inside the Image field.

Setting the focal point

After uploading, a crosshair cursor will appear on the image thumbnail. This is the focal point -- it tells the site which part of the image is most important.

Move the crosshair to the subject of the photo: a person's face, a key object, the most meaningful part of the scene. The site uses the focal point to decide where to center the image when it is displayed at different sizes or cropped to fit a specific layout. If you leave the focal point in the center and your subject is off to one side, parts of the photo may be cut off on certain screen sizes or in certain components.

Previewing the crop

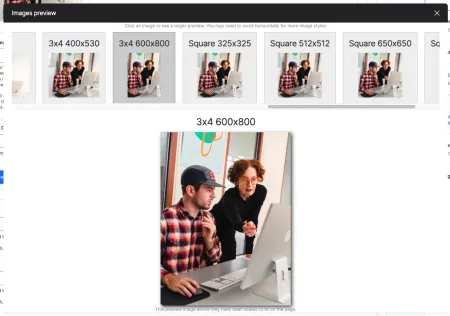
After setting the focal point, click the "Preview" link below the thumbnail. This opens a panel showing you exactly how the image will be cropped at each of the site's standard display sizes -- without you having to save the page first. Use this to confirm your focal point is in the right place before moving on.

Some components, such as those that display images at a fixed 1:1 square ratio, will crop more aggressively than others. The preview will show you each scenario so there are no surprises on the live page.

Finding images in Widen

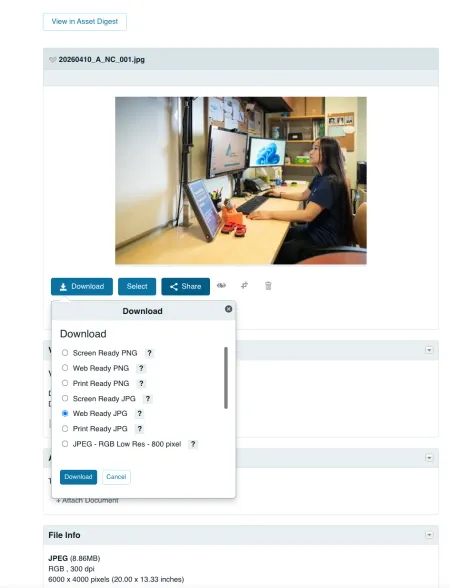
The user interface of  Widen, our Digital Asset Management Platform

Before searching elsewhere, check Widen , Ithaca College's digital asset management system. Widen is the official library of approved photography for use across IC's web presence, organized into portals by school and subject matter.

Images in Widen are already sized for professional use, so they will meet the site's minimum size requirements and are more likely to reflect IC's visual identity guidelines than photos sourced elsewhere.

When saving images from Widen for use on www.Ithaca.edu, select the "Web Ready JPG" or "Web Ready PNG" download presets. When asked about intended use for the image, select "Web (ithaca.edu)".

For guidance on choosing images that align with Ithaca College's brand, including what makes a strong photo and what to avoid, see the Photography section of the IC Brand Guide. It also covers frequently asked questions about usage rights, editing downloaded assets, requesting new additions, and who to contact if you need help.

Additional Tips and Best Practices

Alternative (ALT) text

The Alternative text field is a short written description of the image. It is used by screen readers to describe the image to visitors who cannot see it, and it is displayed in place of the image if the image fails to load. This field is required for accessibility.

Write alt text as a simple, factual description of what the image shows. For example: "A student working at a laptop in Campus Center." You do not need to start with "Image of" or "Photo of" – screen readers already announce that it is an image.

Keep alt text concise. One or two sentences is usually enough. If the image is purely decorative and adds no information to the page, leave the field empty (do not write "decorative" or similar – an empty field signals to screen readers to skip it).

For more guidance on writing effective alt text, see Creating Accessible Web Content.

When not to use an image

Don't upload print materials as images. Flyers, brochures, and event posters are designed to be printed at a specific size and read up close. When uploaded to a web page as an image, the text in them is almost always too small to read on screen, inaccessible to screen readers entirely, and difficult to view on mobile. If the content of a flyer is worth putting on a web page, re-enter it as actual page content using text, headings, and components built for the web.

Don't use images you don't have rights to. Screenshots from Google Images, photos pulled from other websites, and images generated by AI tools may be protected by copyright. Using them without a license or explicit permission can put the college at legal risk. If you are not certain where an image came from or whether you have rights to use it, do not upload it. Stick to images from Widen, photos you or your department took, or images from a source with a clearly stated license for this type of use.

Don't use images as a substitute for text. Announcements, deadlines, tables, and other information embedded inside an image cannot be found by search engines, cannot be read by screen readers, and cannot be updated without replacing the image entirely. If the information matters, it should exist as real text on the page.

Tips for choosing good images

  • Use landscape-oriented photos for most components. Portrait photos (taller than they are wide) will often be cropped heavily on widescreen displays.
  • Avoid images with text baked in. Text in images cannot be read by screen readers and does not resize cleanly on mobile devices.
  • For profile photos and headshots, center the focal point on the subject's face. Many profile-related components display images in a square or circular crop.
  • Check your work on a mobile phone or tablet, to ensure that your image is displayed as you expected it, regardless of what device a visitor is using.